Optimizing 3D printing for pet accessories requires balancing cure time and exposure time to ensure durability and safety. Shorter exposure times can result in incomplete curing, compromising the structural integrity, while excessively long cure times may cause brittleness and deformation. Proper calibration between these parameters guarantees high-quality, resilient prints suitable for pet use.
Table of Comparison
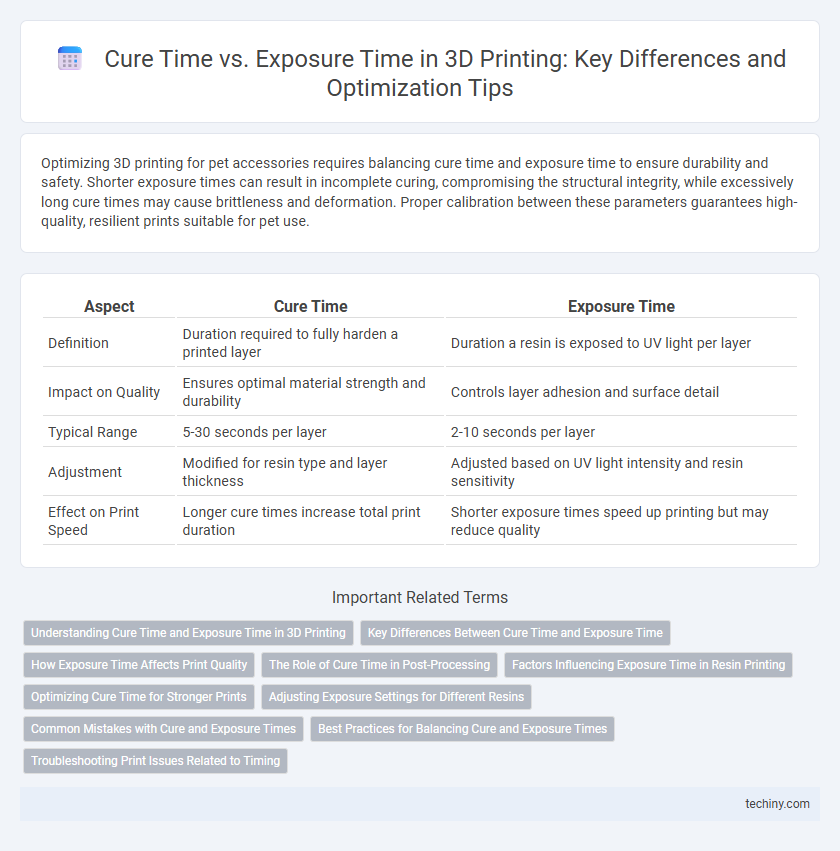
| Aspect | Cure Time | Exposure Time |
|---|---|---|
| Definition | Duration required to fully harden a printed layer | Duration a resin is exposed to UV light per layer |
| Impact on Quality | Ensures optimal material strength and durability | Controls layer adhesion and surface detail |
| Typical Range | 5-30 seconds per layer | 2-10 seconds per layer |
| Adjustment | Modified for resin type and layer thickness | Adjusted based on UV light intensity and resin sensitivity |
| Effect on Print Speed | Longer cure times increase total print duration | Shorter exposure times speed up printing but may reduce quality |
Understanding Cure Time and Exposure Time in 3D Printing
Cure time in 3D printing refers to the duration required for resin to solidify fully under light exposure, directly impacting print quality and mechanical properties. Exposure time is the specific period each layer of resin is exposed to UV or laser light, controlling the layer's polymerization and influencing dimensional accuracy. Proper balancing of cure time and exposure time optimizes print strength, detail resolution, and minimizes defects like warping or incomplete curing.
Key Differences Between Cure Time and Exposure Time
Cure time refers to the total duration required for a resin or material to fully solidify and attain optimal mechanical properties after printing, while exposure time denotes the precise interval each layer is subjected to UV light during the printing process. Exposure time directly influences layer adhesion and print resolution, whereas cure time affects the final strength, durability, and stability of the printed object. Understanding the distinction is crucial for optimizing print quality, as improper exposure can lead to incomplete curing, and insufficient cure time may result in weak or unstable prints.
How Exposure Time Affects Print Quality
Exposure time in 3D printing directly impacts the degree of resin polymerization, affecting print resolution and surface finish. Longer exposure times ensure better layer adhesion and reduced layer lines but risk over-curing, leading to loss of detail and potential print warping. Optimizing exposure time balances curing depth with precision, crucial for achieving high-quality, accurate 3D printed parts.
The Role of Cure Time in Post-Processing
Cure time plays a critical role in the post-processing of 3D printed parts by enhancing mechanical properties and dimensional stability through complete polymerization. Insufficient cure time can result in under-cured surfaces that are prone to deformation, reduced strength, and poor adhesion between layers. Optimizing cure time ensures thorough cross-linking of resin molecules, which directly impacts the final part's durability and accuracy.
Factors Influencing Exposure Time in Resin Printing
Exposure time in resin 3D printing is influenced by factors such as resin viscosity, layer thickness, light source intensity, and photoinitiator concentration. Higher resin viscosity and thicker layers typically require longer exposure times for proper curing, while increased light intensity and efficient photoinitiators reduce the necessary exposure duration. Accurate calibration of these parameters ensures optimal print quality and structural integrity in resin-based 3D prints.
Optimizing Cure Time for Stronger Prints
Optimizing cure time in 3D printing is critical for achieving stronger and more durable prints, as insufficient exposure can lead to weak layer adhesion and structural defects. Precise calibration of exposure time ensures that each layer is fully cured without overcuring, which can cause brittleness or dimensional inaccuracies. Utilizing manufacturer guidelines and test prints to adjust UV intensity and exposure duration enhances mechanical properties and overall print quality.
Adjusting Exposure Settings for Different Resins
Adjusting exposure settings for different resins in 3D printing is critical to balance cure time and exposure time for optimal print quality. Each resin type requires specific exposure times to ensure proper layer adhesion and minimize curing defects, with faster cure times often needed for more opaque or viscous formulations. Fine-tuning exposure settings based on resin characteristics significantly improves surface finish and dimensional accuracy in stereolithography (SLA) and digital light processing (DLP) 3D printers.
Common Mistakes with Cure and Exposure Times
Incorrectly setting cure time and exposure time in 3D printing often results in weak or brittle prints due to under-curing or over-curing resin material. A common mistake is using uniform exposure across all layers, disregarding the variations in layer thickness and geometry that require customized curing to ensure optimal strength and detail. Misjudging exposure times can also cause layer adhesion problems and surface imperfections, significantly impacting the print's overall quality and durability.
Best Practices for Balancing Cure and Exposure Times
Balancing cure time and exposure time is crucial for achieving high-quality 3D prints with precise layer adhesion and minimal defects. Optimizing exposure time ensures resin layers cure thoroughly without overexposure, which can cause brittleness or loss of fine details. Implementing iterative test prints to fine-tune these parameters based on resin type and printer model enhances the overall durability and resolution of the final 3D printed object.
Troubleshooting Print Issues Related to Timing
Cure time and exposure time critically affect resin polymerization in 3D printing, with incorrect settings often causing print defects like layer delamination or incomplete curing. Adjusting exposure time can resolve undercured prints by ensuring each layer receives sufficient UV light, while extending cure time enhances overall part strength and surface finish consistency. Monitoring these parameters through test prints and manufacturer guidelines enables precise troubleshooting and optimal print quality.
Cure Time vs Exposure Time Infographic