G-code serves as the essential instruction set that directs a 3D printer's movements and extrusion processes while a slicing profile defines the specific settings such as layer height, print speed, and temperature used to generate that G-code. Selecting an optimal slicing profile tailored to the pet model's material and detail requirements ensures precise dimensional accuracy and surface quality in the final 3D printed pet. Understanding the interplay between G-code commands and slicing profile parameters is crucial for achieving consistent and high-quality prints of complex pet designs.
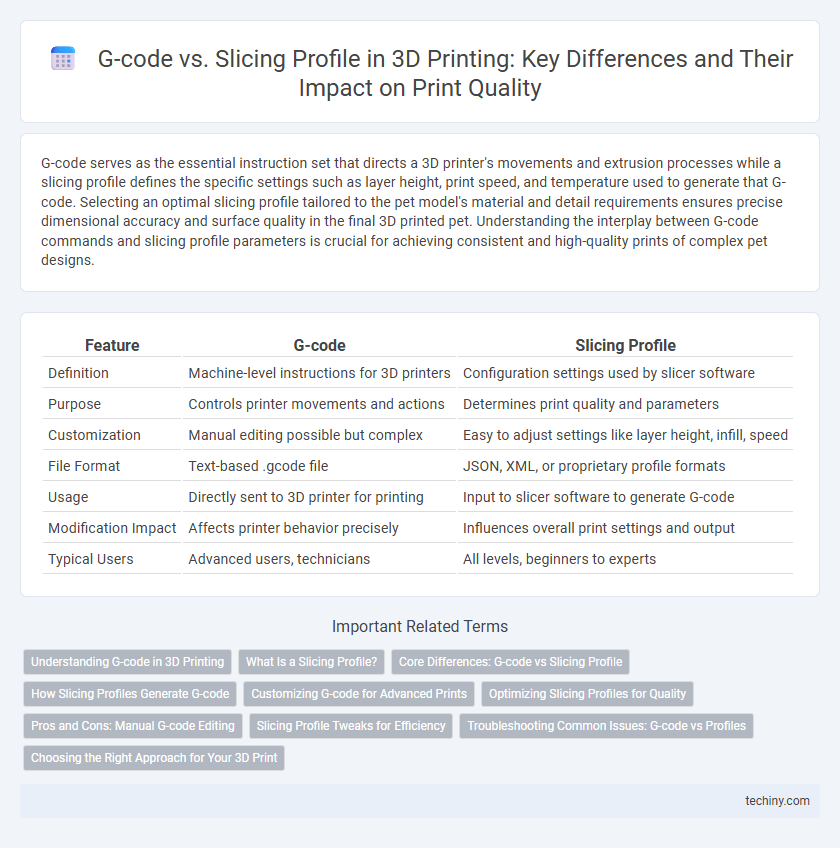
Table of Comparison
| Feature | G-code | Slicing Profile |
|---|---|---|
| Definition | Machine-level instructions for 3D printers | Configuration settings used by slicer software |
| Purpose | Controls printer movements and actions | Determines print quality and parameters |
| Customization | Manual editing possible but complex | Easy to adjust settings like layer height, infill, speed |
| File Format | Text-based .gcode file | JSON, XML, or proprietary profile formats |
| Usage | Directly sent to 3D printer for printing | Input to slicer software to generate G-code |
| Modification Impact | Affects printer behavior precisely | Influences overall print settings and output |
| Typical Users | Advanced users, technicians | All levels, beginners to experts |
Understanding G-code in 3D Printing
G-code is the essential programming language that directs 3D printers by specifying exact movements, speeds, and extrusion commands for print heads layer by layer. Unlike slicing profiles that determine overall print settings such as layer height and infill patterns, G-code provides the precise path instructions that the printer's hardware executes in real time. Mastery of G-code enables fine-tuning of print accuracy, troubleshooting, and advanced customization beyond standard slicer outputs.
What Is a Slicing Profile?
A slicing profile in 3D printing refers to the set of parameters and settings that control how a 3D model is converted into layers and toolpaths for the printer. It includes variables like layer height, print speed, infill density, and support structures, optimizing the print quality and speed. Unlike G-code, which is the actual machine instruction code generated, the slicing profile defines the rules and preferences used during the slicing process.
Core Differences: G-code vs Slicing Profile
G-code and slicing profiles serve distinct roles in 3D printing; G-code is the machine language that directs the printer's movements and operations layer by layer, while the slicing profile contains the predefined settings used by slicing software to generate G-code from a 3D model. The slicing profile includes essential parameters such as layer height, print speed, temperature, and infill density, which shape the final print quality and efficiency. Understanding these core differences enables precise control over print customization and troubleshooting, leading to optimized 3D print results.
How Slicing Profiles Generate G-code
Slicing profiles play a crucial role in 3D printing by converting 3D models into G-code instructions that the printer can execute. These profiles define parameters such as layer height, print speed, and temperature, which directly influence the path planning and extrusion commands embedded in the resulting G-code. By optimizing slicing profiles, users enhance print quality and efficiency through precise control over the generated G-code commands.
Customizing G-code for Advanced Prints
Customizing G-code enables precise control over printer movements, extrusion rates, and temperature settings, optimizing complex 3D prints beyond standard slicing profiles. Advanced users modify G-code to implement unique printing sequences, support structures, or multi-material transitions that slicing software may not readily offer. Tailoring G-code enhances print quality, reduces material waste, and accommodates specific hardware capabilities for high-detail or functional prototypes.
Optimizing Slicing Profiles for Quality
Optimizing slicing profiles is essential for achieving high-quality 3D prints, as it directly influences layer height, print speed, and temperature controls. Precise adjustments to infill density, support structures, and cooling settings enhance surface finish and dimensional accuracy, minimizing defects like warping or stringing. Effective slicing profile optimization ensures that the generated G-code translates into consistent, reliable extrusion patterns tailored to the printer and filament properties.
Pros and Cons: Manual G-code Editing
Manual G-code editing offers precise control over 3D printing parameters, allowing users to fine-tune every aspect of the print, which can improve print quality and troubleshoot specific issues. However, this process is time-consuming and requires in-depth knowledge of G-code commands, making it less accessible for beginners. Slicing profiles automate this process by generating optimized G-code based on preset parameters, but they lack the granular customization that manual editing provides.
Slicing Profile Tweaks for Efficiency
Slicing profile tweaks significantly enhance 3D printing efficiency by optimizing layer height, print speed, and infill density tailored to specific models and materials. Adjusting retraction settings and temperature controls within the slicing profile minimizes stringing and warping, resulting in higher quality prints with less post-processing. Fine-tuning support structures and shell thickness also reduces material waste and print time, contributing to a more cost-effective and environmentally friendly 3D printing workflow.
Troubleshooting Common Issues: G-code vs Profiles
G-code errors often stem from syntax mistakes or machine-specific commands that fail during printing, requiring careful line-by-line inspection or simulation to troubleshoot. Slicing profile issues typically involve incorrect settings such as layer height, print speed, or temperature, which result in poor print quality or failed adhesion. Ensuring compatibility between the slicing software and printer firmware, alongside thorough profile calibration, minimizes common printing faults caused by both G-code and slicing profiles.
Choosing the Right Approach for Your 3D Print
Selecting the appropriate approach between G-code and slicing profiles hinges on the desired control and customization of your 3D print. G-code offers precise, line-by-line control ideal for advanced users seeking to modify printing parameters directly, while slicing profiles provide a streamlined method by converting 3D models into optimal machine instructions based on preset settings tailored to specific materials and printers. Balancing the need for precision versus automation ensures improved print quality, efficiency, and successful outcomes in additive manufacturing workflows.
G-code vs Slicing Profile Infographic