In 3D printing pets, shells refer to the outer walls of the model that provide structure and surface finish, while perimeters are the individual layers that build these walls. Increasing the number of shells enhances durability and detail but also increases print time and material use. Optimizing the balance between shells and perimeters ensures a strong, detailed pet model without unnecessary resource consumption.
Table of Comparison
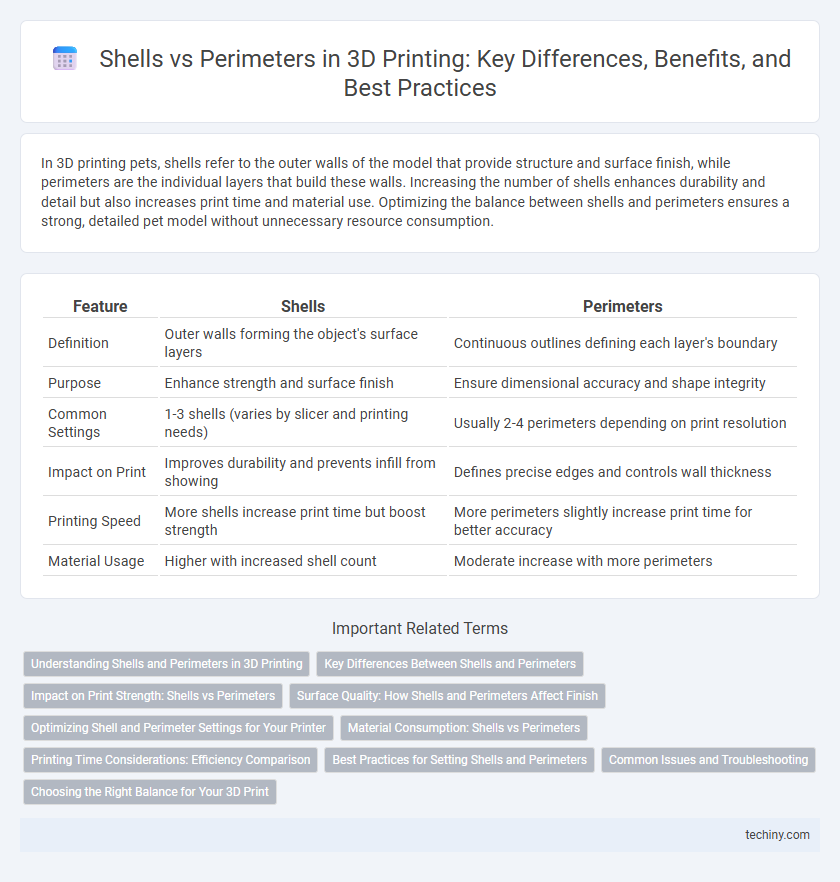
| Feature | Shells | Perimeters |
|---|---|---|
| Definition | Outer walls forming the object's surface layers | Continuous outlines defining each layer's boundary |
| Purpose | Enhance strength and surface finish | Ensure dimensional accuracy and shape integrity |
| Common Settings | 1-3 shells (varies by slicer and printing needs) | Usually 2-4 perimeters depending on print resolution |
| Impact on Print | Improves durability and prevents infill from showing | Defines precise edges and controls wall thickness |
| Printing Speed | More shells increase print time but boost strength | More perimeters slightly increase print time for better accuracy |
| Material Usage | Higher with increased shell count | Moderate increase with more perimeters |
Understanding Shells and Perimeters in 3D Printing
Shells and perimeters are critical parameters in 3D printing that define the outer walls of a printed object, directly impacting its strength and surface quality. Shells refer to the number of times the printer lays down the outer wall layers, while perimeters specify the exact outlines printed for each layer, influencing structural integrity and detail resolution. Adjusting shells and perimeters optimizes print durability and finish, balancing material use with functional and aesthetic requirements.
Key Differences Between Shells and Perimeters
Shells refer to the number of outer layers that form the solid boundary of a 3D printed object, enhancing strength and surface finish. Perimeters specifically denote the individual outer outlines traced by the nozzle, which define the object's shape and contribute to dimensional accuracy. The key difference lies in that shells encompass multiple perimeters stacked to create thickness, while perimeters are the single line paths that make up each shell layer.
Impact on Print Strength: Shells vs Perimeters
Shells and perimeters play critical roles in defining the strength of 3D prints, with shells providing multiple solid outer layers that enhance resistance against external forces. Increasing the number of perimeters, which are individual outlines forming the object's walls, directly improves the durability and structural integrity by reinforcing the print's edge. Balancing shell thickness and perimeter count is essential for optimizing mechanical strength, especially in load-bearing applications or functional prototypes.
Surface Quality: How Shells and Perimeters Affect Finish
Increasing the number of shells in 3D printing enhances surface quality by providing better layer adhesion and reducing visible gaps, resulting in a smoother finish. Perimeters define the outermost contours and directly impact surface detail sharpness and dimensional accuracy. Optimizing shells and perimeters balances structural integrity and aesthetic finish, reducing defects like blobs or zits on the printed object's surface.
Optimizing Shell and Perimeter Settings for Your Printer
Optimizing shell and perimeter settings significantly impacts the strength and surface quality of 3D printed models by controlling the number of outer layers and wall thickness. Increasing the number of shells or perimeter lines enhances part durability and reduces print time by minimizing infill reliance. Adjusting these parameters in slicing software like Cura or PrusaSlicer allows precise balance between material usage, print speed, and mechanical resilience.
Material Consumption: Shells vs Perimeters
In 3D printing, shells refer to the outer walls of a print while perimeters are the individual outlines making up those shells, impacting material consumption significantly. Increasing the number of shells or perimeters results in higher filament usage because each additional loop requires more material to create a thicker, more durable outer layer. Optimizing shell and perimeter settings balances structural integrity with material efficiency, minimizing waste during the printing process.
Printing Time Considerations: Efficiency Comparison
Increasing the number of shells or perimeters directly impacts 3D printing time, as each additional loop requires the printer nozzle to complete a full pass around the model. Shells (outer walls) generally have a greater influence on print time compared to internal perimeters since they define the part's external surface quality and must be perfectly aligned, demanding slower speeds and precise movements. Optimizing the balance between shells and perimeters can reduce printing time while maintaining adequate strength and surface finish in FDM or SLA 3D printing processes.
Best Practices for Setting Shells and Perimeters
Setting optimal shells and perimeters in 3D printing enhances part strength and surface quality by balancing wall thickness and print time. Best practices include configuring at least two to three perimeters for standard models while adjusting shell count based on the desired mechanical properties and print layer height. Ensuring perimeter overlap and consistent extrusion width prevents gaps and improves adhesion between shells, resulting in structurally sound and visually smooth prints.
Common Issues and Troubleshooting
Common issues with shells versus perimeters in 3D printing include weak walls, poor layer adhesion, and surface imperfections. Troubleshooting often involves adjusting the number of shell layers to increase wall strength, optimizing extrusion width for better perimeter bonding, and calibrating print speed and temperature to prevent under-extrusion or over-extrusion. Ensuring slicer settings align with the filament type and printer capabilities minimizes defects related to shell and perimeter inconsistencies.
Choosing the Right Balance for Your 3D Print
Choosing the right balance between shells and perimeters in 3D printing directly impacts the strength, surface finish, and material usage of the final object. Increasing the number of shells enhances wall thickness and durability, making prints more robust for functional parts, while adjusting perimeters controls the detail and ensures smooth external surfaces. Optimizing this balance depends on the print's purpose, with thicker shells favored for mechanical strength and more perimeters prioritized for intricate designs requiring fine surface quality.
Shells vs Perimeters Infographic