Slicer settings control how a 3D printing pet model is digitally sliced into layers, determining print speed, layer height, infill, and support structures to optimize detail and strength. Firmware settings, embedded in the printer's hardware, manage mechanical and temperature controls like motor movement, bed leveling, and extrusion rates for consistent print quality. Proper coordination of slicer and firmware settings ensures accurate, high-quality 3D printed pet models with minimal errors.
Table of Comparison
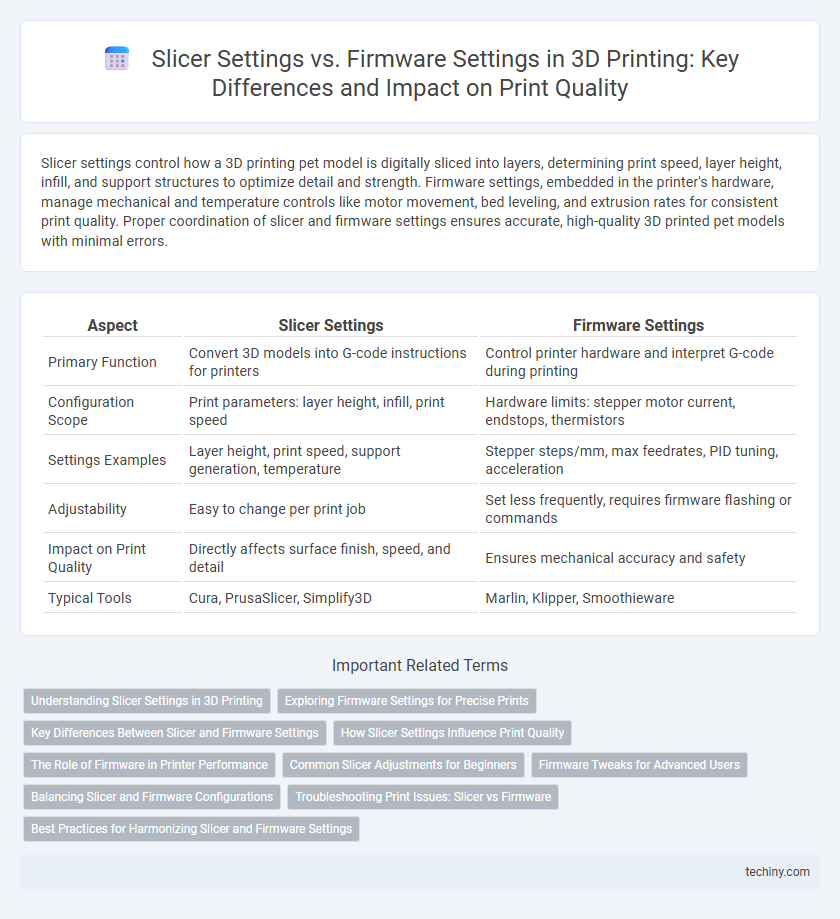
| Aspect | Slicer Settings | Firmware Settings |
|---|---|---|
| Primary Function | Convert 3D models into G-code instructions for printers | Control printer hardware and interpret G-code during printing |
| Configuration Scope | Print parameters: layer height, infill, print speed | Hardware limits: stepper motor current, endstops, thermistors |
| Settings Examples | Layer height, print speed, support generation, temperature | Stepper steps/mm, max feedrates, PID tuning, acceleration |
| Adjustability | Easy to change per print job | Set less frequently, requires firmware flashing or commands |
| Impact on Print Quality | Directly affects surface finish, speed, and detail | Ensures mechanical accuracy and safety |
| Typical Tools | Cura, PrusaSlicer, Simplify3D | Marlin, Klipper, Smoothieware |
Understanding Slicer Settings in 3D Printing
Slicer settings in 3D printing directly influence the printing process by defining layer height, print speed, and infill density, which determines the quality and strength of the final object. Unlike firmware settings that control hardware-level functions such as temperature limits and motion parameters, slicer settings enable precise customization of print models for different materials and geometries. Mastering slicer parameters like support structures, retraction distance, and shell thickness ensures optimized print results tailored to specific design and material requirements.
Exploring Firmware Settings for Precise Prints
Firmware settings in 3D printing control fundamental hardware behaviors such as motor current, axis steps per millimeter, and thermal limits, directly impacting print precision and safety. Configuring firmware parameters like jerk, acceleration, and PID tuning ensures smoother motion control and consistent extrusion, reducing artifacts and enhancing dimensional accuracy. Firmware adjustments complement slicer settings by stabilizing the mechanical foundation, enabling the slicer-generated g-code to execute with higher fidelity and repeatability.
Key Differences Between Slicer and Firmware Settings
Slicer settings control print parameters like layer height, infill density, and print speed, directly influencing the 3D model's slicing and path generation. Firmware settings operate at the hardware level, managing printer behaviors such as stepper motor current, axis calibration, and thermal limits. The key difference lies in slicer settings optimizing print quality and appearance, while firmware settings ensure precise mechanical function and safety.
How Slicer Settings Influence Print Quality
Slicer settings directly influence print quality by controlling parameters such as layer height, print speed, infill density, and temperature, which determine the accuracy, strength, and surface finish of the 3D print. Optimizing these settings improves dimensional accuracy and reduces defects like stringing, warping, and layer shifting, which firmware settings alone cannot fully address. While firmware manages hardware behavior, slicer configurations tailor the printing process to specific models and materials, enabling detailed customization for enhanced print quality.
The Role of Firmware in Printer Performance
Firmware settings directly control the hardware behavior of 3D printers, managing movements, temperature regulation, and safety features essential for accurate prints. Unlike slicer settings that prepare the digital model for printing, firmware ensures precise execution by interpreting g-code commands and adjusting motor and sensor responses in real-time. Optimal firmware calibration enhances printer reliability, reduces mechanical errors, and maximizes print quality by synchronizing machine operations with slicer instructions.
Common Slicer Adjustments for Beginners
Common slicer adjustments for beginners include layer height, print speed, and infill density, which directly impact print quality and time. Calibrating nozzle temperature and bed adhesion settings within the slicer ensures better filament flow and reduces warping issues. While firmware settings control hardware limits, slicer configurations offer more accessible customization to optimize individual print parameters.
Firmware Tweaks for Advanced Users
Firmware tweaks in 3D printing enable advanced users to optimize machine performance beyond standard slicer settings by adjusting parameters like motor current, thermal protections, and acceleration profiles directly within the printer's firmware. Customizing firmware settings allows precise control over stepper driver behavior, sensor response, and communication protocols, improving print quality and reliability. Mastery of firmware configuration requires technical knowledge but offers significant enhancements in precision and machine longevity for experienced users.
Balancing Slicer and Firmware Configurations
Balancing slicer settings and firmware configurations is essential for achieving high-quality 3D prints, as slicer parameters like layer height, print speed, and extrusion temperature directly control the printing process while firmware settings govern hardware behaviors such as stepper motor currents and thermal protections. Optimizing slicer settings without properly calibrated firmware can lead to issues like layer misalignment or overheating, whereas fine-tuned firmware ensures consistent movement and temperature management that complements slicer instructions. Effective coordination between slicer and firmware adjustments enhances print accuracy, surface finish, and overall reliability.
Troubleshooting Print Issues: Slicer vs Firmware
Troubleshooting print issues requires distinguishing between slicer settings and firmware settings, as each influences different aspects of the print. Slicer settings control variables like layer height, print speed, and support structures, directly impacting the model's geometry and surface quality. Firmware settings manage hardware behavior such as motor currents, temperature regulation, and stepper calibration, critical for reliable machine operation and preventing mechanical errors.
Best Practices for Harmonizing Slicer and Firmware Settings
Optimizing 3D printing performance requires precise coordination between slicer settings and firmware configurations, ensuring parameters like nozzle temperature, print speed, and stepper motor currents are consistently aligned. Verifying that firmware limits support slicer-generated commands prevents issues such as layer shifts or thermal runaway errors, promoting reliable and high-quality prints. Regular calibration and firmware updates complement slicer adjustments, creating a harmonious workflow that maximizes print accuracy and machine safety.
Slicer Settings vs Firmware Settings Infographic