Bridging in 3D printing involves creating horizontal structures between two points without support, requiring precise control of print speed and extrusion to prevent sagging. Overhangs occur when layers extend outward beyond the previous layer's edge, often needing support to avoid collapse or deformation. Mastering the balance between bridging and overhang techniques enhances print quality, especially for intricate pet models with complex geometries.
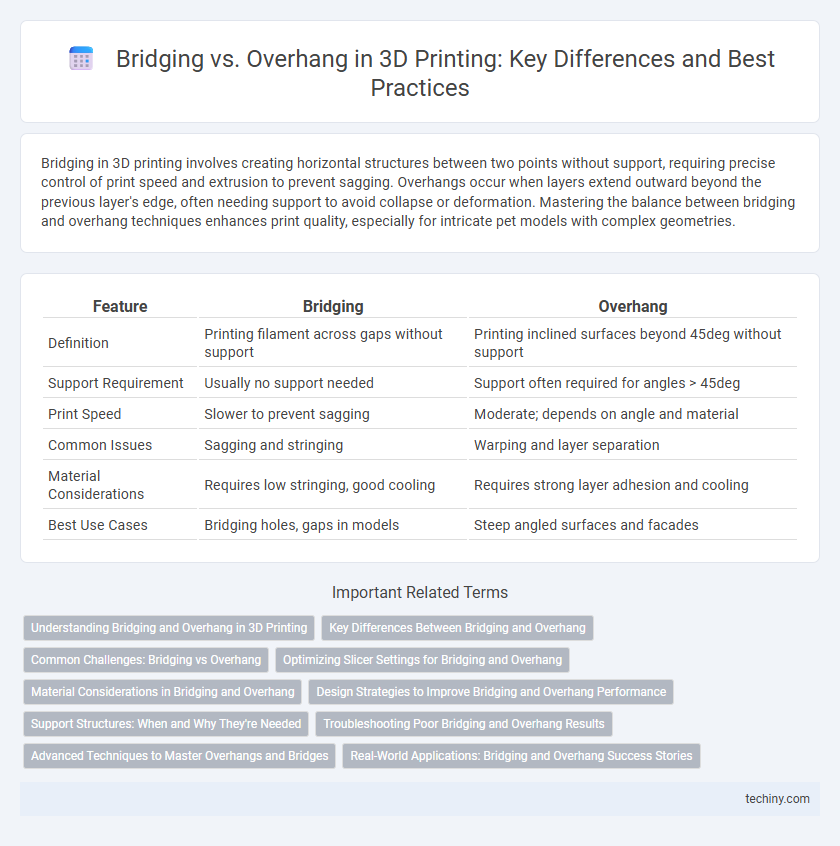
Table of Comparison
| Feature | Bridging | Overhang |
|---|---|---|
| Definition | Printing filament across gaps without support | Printing inclined surfaces beyond 45deg without support |
| Support Requirement | Usually no support needed | Support often required for angles > 45deg |
| Print Speed | Slower to prevent sagging | Moderate; depends on angle and material |
| Common Issues | Sagging and stringing | Warping and layer separation |
| Material Considerations | Requires low stringing, good cooling | Requires strong layer adhesion and cooling |
| Best Use Cases | Bridging holes, gaps in models | Steep angled surfaces and facades |
Understanding Bridging and Overhang in 3D Printing
Bridging and overhang are critical features in 3D printing that affect print quality and structural integrity. Bridging refers to printing a horizontal layer across two supports without additional support material, requiring precise cooling and extrusion control to prevent sagging. Overhang involves printing surfaces that extend outward from the previous layer at an angle, where excessive overhang angles can lead to drooping and poor surface finish unless properly managed with support structures or optimized print settings.
Key Differences Between Bridging and Overhang
Bridging in 3D printing involves extruding filament across gaps with no support directly beneath, requiring precise cooling and extrusion speed to prevent sagging. Overhangs occur when a layer extends outward beyond the previous layer, needing careful angle limitations and support structures to maintain print quality. The key difference lies in bridging spanning open spaces without supports, while overhangs rely on support or design strategies to avoid print failure.
Common Challenges: Bridging vs Overhang
Bridging in 3D printing involves printing a horizontal span between two points, often resulting in sagging or stringing due to insufficient cooling or extrusion settings. Overhangs challenge printers by requiring layers to be printed with minimal support underneath, frequently causing drooping or rough surfaces when angles exceed 45 degrees. Common issues include inadequate layer adhesion, poor print speed calibration, and thermal management, which affect the quality and precision of both bridges and overhangs.
Optimizing Slicer Settings for Bridging and Overhang
Optimizing slicer settings for bridging and overhangs is crucial for improving print quality in 3D printing. Key parameters include reducing print speed to enhance filament extrusion consistency, increasing cooling fan speed to solidify layers faster, and adjusting extrusion temperature to balance adhesion and flow. Proper tuning of these settings minimizes sagging in overhangs and ensures clean, stable bridges without support structures.
Material Considerations in Bridging and Overhang
Material considerations in bridging and overhangs significantly affect the quality and strength of 3D printed parts. Flexible materials like TPU require slower print speeds and optimized cooling settings to prevent sagging during bridging, while rigid materials such as PLA provide better self-support without extensive support structures. Overhangs demand materials with good layer adhesion and minimal warping, as poor adhesion or excessive shrinkage can lead to deformation and compromised surface finish.
Design Strategies to Improve Bridging and Overhang Performance
Optimizing bridging and overhang performance in 3D printing involves precise calibration of print speed, cooling fans, and extrusion rates to ensure proper layer adhesion and minimize sagging. Incorporating support structures or designing gradual angle transitions can significantly enhance overhang quality by providing temporary reinforcement during printing. Utilizing advanced slicing software with customizable bridging parameters and adjusting nozzle temperature enables more consistent filament flow, leading to improved print stability and surface finish.
Support Structures: When and Why They're Needed
Support structures in 3D printing become essential when dealing with overhangs exceeding 45 degrees and intricate bridging sections that cannot maintain structural integrity on their own. Overhangs require supports to prevent sagging or deformation during the print process, while bridging demands precise cooling and minimal span length to avoid drooping. Optimizing support placement reduces material usage and post-processing time, enhancing print quality and efficiency.
Troubleshooting Poor Bridging and Overhang Results
Poor bridging and overhang results in 3D printing often stem from insufficient cooling, incorrect print speed, or improper extrusion settings. Adjusting cooling fans to enhance layer solidification and reducing print speed can improve filament support across gaps and overhangs. Ensuring optimal extrusion temperature and calibrating flow rate prevent sagging and stringing, leading to cleaner bridge lines and smoother overhangs.
Advanced Techniques to Master Overhangs and Bridges
Mastering overhangs and bridges in 3D printing involves optimizing cooling strategies and print speed to enhance layer adhesion and prevent sagging. Utilizing support structures and adjusting nozzle temperature can significantly improve print quality on challenging geometries. Advanced slicer settings, such as variable layer height and customized retraction, play a crucial role in achieving precise results on complex overhangs and bridging sections.
Real-World Applications: Bridging and Overhang Success Stories
Bridging techniques in 3D printing enable the creation of strong, unsupported horizontal spans used in architectural models and functional prototypes, reducing the need for support structures and post-processing. Overhang success stories highlight improvements in material formulations and printer calibration, allowing complex geometries like drone frames and custom medical implants to be printed with minimal warping or sagging. Real-world applications demonstrate how optimized bridging and overhang strategies increase print efficiency, structural integrity, and design freedom in aerospace, automotive, and consumer product industries.
Bridging vs Overhang Infographic