Z-Hop in 3D printing involves lifting the nozzle during travel moves to prevent it from scratching or dragging across the printed pet model, enhancing surface quality and reducing the risk of layer shifting. Choosing no Z-Hop allows for faster print times and less nozzle travel but increases the chance of nozzle collisions with delicate pet features or stringing issues. Balancing Z-Hop settings depends on the pet model's complexity and the desired print finish, with Z-Hop favored for intricate designs and no Z-Hop suitable for simpler, sturdier prints.
Table of Comparison
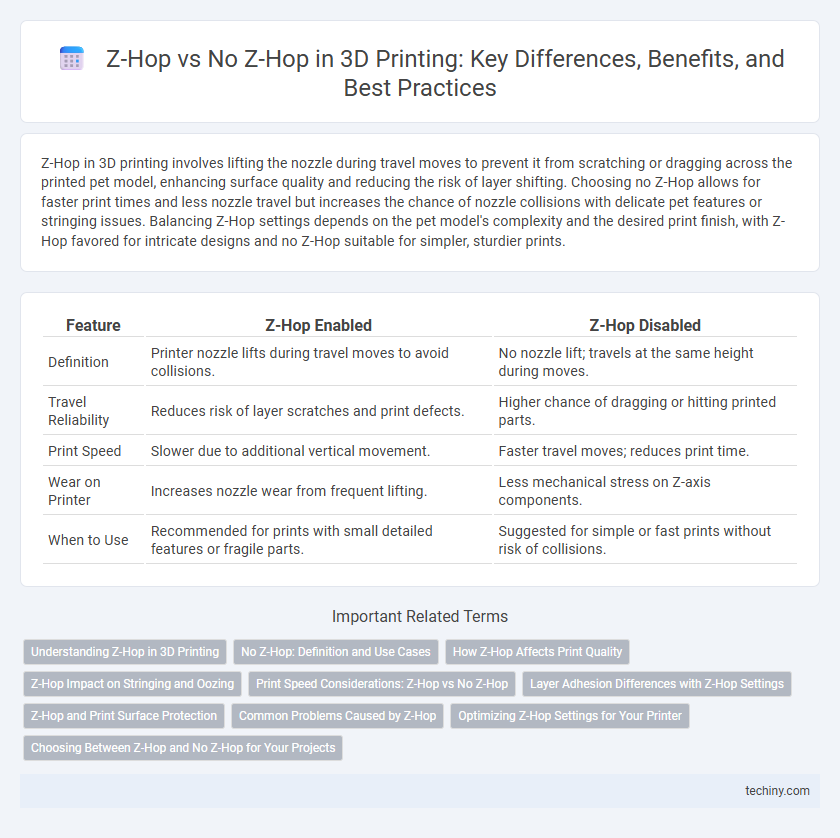
| Feature | Z-Hop Enabled | Z-Hop Disabled |
|---|---|---|
| Definition | Printer nozzle lifts during travel moves to avoid collisions. | No nozzle lift; travels at the same height during moves. |
| Travel Reliability | Reduces risk of layer scratches and print defects. | Higher chance of dragging or hitting printed parts. |
| Print Speed | Slower due to additional vertical movement. | Faster travel moves; reduces print time. |
| Wear on Printer | Increases nozzle wear from frequent lifting. | Less mechanical stress on Z-axis components. |
| When to Use | Recommended for prints with small detailed features or fragile parts. | Suggested for simple or fast prints without risk of collisions. |
Understanding Z-Hop in 3D Printing
Z-Hop in 3D printing refers to the printer's nozzle lifting slightly during travel moves to avoid hitting printed parts, reducing the risk of collisions and stringing. Enabling Z-Hop improves print quality by preventing layer disruptions, especially in complex models with many retractions. Disabling Z-Hop can speed up print times but increases the chance of nozzle dragging and defects on delicate features.
No Z-Hop: Definition and Use Cases
No Z-Hop in 3D printing refers to a slicing setting where the printer's nozzle remains at the same layer height during travel moves, avoiding vertical lifting. This technique reduces print time and minimizes stringing when printing models with closely spaced features or thin walls. No Z-Hop is advantageous for materials prone to oozing, like TPU or PETG, as it minimizes layer shifts and improves print surface finish by preventing unnecessary nozzle retractions.
How Z-Hop Affects Print Quality
Z-Hop in 3D printing lifts the nozzle slightly during travel moves, reducing the risk of scratching or knocking over printed parts, which enhances surface finish quality. Avoiding Z-Hop can increase the chance of layer scarring or stringing due to nozzle dragging, especially on complex prints with multiple retractions. Optimal Z-Hop settings balance travel speed and lift height to minimize print defects and maintain dimensional accuracy.
Z-Hop Impact on Stringing and Oozing
Z-Hop minimizes stringing and oozing by lifting the nozzle during travel moves, reducing unwanted filament drips between print areas. This technique improves print quality by preventing oozing that causes thin strands and blobs on the surface. While enabling Z-Hop can slightly increase print time, it significantly enhances cleanliness and detail in complex prints.
Print Speed Considerations: Z-Hop vs No Z-Hop
Z-Hop impacts print speed by introducing vertical movements during travel moves, which can slightly slow down the printing process compared to No Z-Hop. While No Z-Hop allows for faster travel speeds by keeping the nozzle at the same layer height, it increases the risk of nozzle collisions with printed parts or stringing. Balancing speed and print quality involves considering the complexity of the model and the printer's capabilities when choosing between Z-Hop and No Z-Hop settings.
Layer Adhesion Differences with Z-Hop Settings
Z-Hop movements in 3D printing slightly lift the nozzle during travel moves, reducing the risk of dragging and layer misalignment, which enhances overall layer adhesion by preventing surface defects. In contrast, disabling Z-Hop can lead to nozzle collisions with printed layers, causing inconsistent extrusion and weaker interlayer bonding. Optimizing Z-Hop height ensures smooth retractions and precise layer positioning, directly improving print strength and surface finish quality.
Z-Hop and Print Surface Protection
Z-Hop raises the print nozzle during travel moves to prevent it from dragging across the print surface, significantly reducing the risk of scratches and surface defects. This feature is crucial for preserving the integrity of delicate or glossy print beds like glass or PEI sheets by minimizing direct contact. While Z-Hop can slightly increase print time, it enhances surface protection and print quality by avoiding nozzle collisions and scarring.
Common Problems Caused by Z-Hop
Z-Hop in 3D printing can cause common issues such as layer misalignment and increased print time due to the nozzle lifting and moving between points. This upward movement may also contribute to stringing and oozing, negatively affecting surface quality. Disabling Z-Hop can reduce these problems but might increase the risk of nozzle collisions with printed parts.
Optimizing Z-Hop Settings for Your Printer
Optimizing Z-hop settings involves balancing retraction height to prevent nozzle collisions with printed parts while minimizing print time and stringing. A typical Z-hop height ranges between 0.2 mm to 0.8 mm depending on layer height and printer calibration, ensuring smooth layer transitions without damaging delicate features. Experimenting with Z-hop can improve print quality by reducing layer marks and filament buildup on the nozzle when printing complex models.
Choosing Between Z-Hop and No Z-Hop for Your Projects
Choosing between Z-Hop and no Z-Hop settings depends on the complexity and precision required in your 3D print. Z-Hop lifts the nozzle during travel moves to prevent scratching or dragging on the printed surface, which is ideal for models with intricate details or multiple islands. Opting for no Z-Hop can speed up print times and reduce stringing when printing simpler, less delicate objects.
Z-Hop vs No Z-Hop Infographic