Retraction and Z-hop are critical settings in 3D printing pets to improve print quality and reduce defects. Retraction pulls filament back to prevent stringing during travel moves, while Z-hop raises the nozzle to avoid collisions with printed parts. Optimizing retraction minimizes oozing, whereas tuning Z-hop helps protect delicate features from being scraped or knocked over.
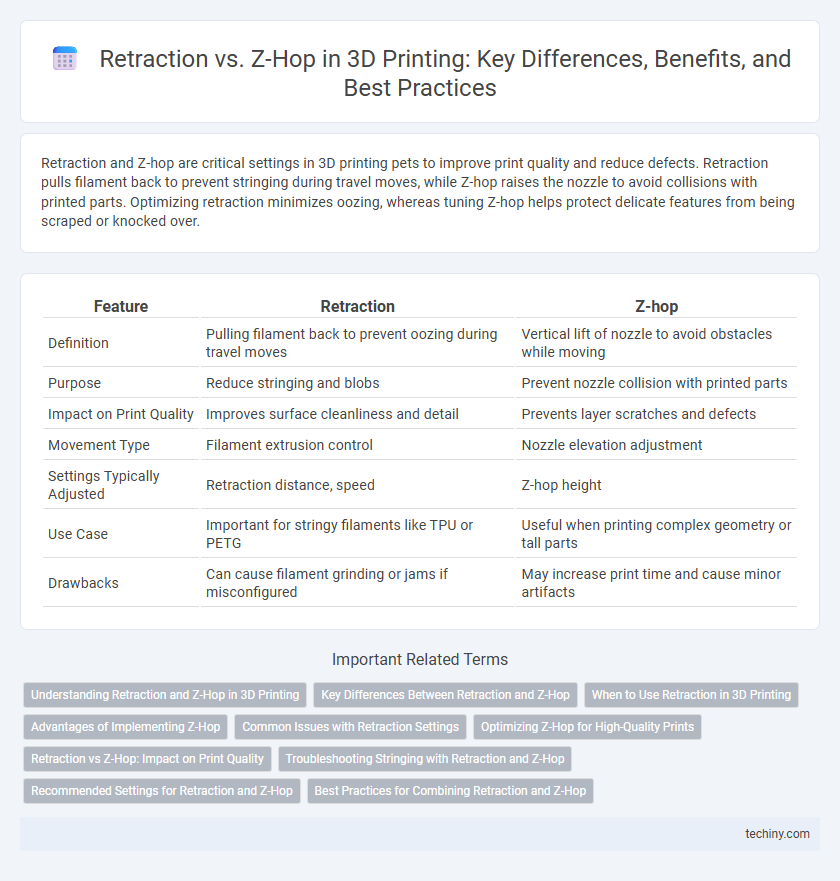
Table of Comparison
| Feature | Retraction | Z-hop |
|---|---|---|
| Definition | Pulling filament back to prevent oozing during travel moves | Vertical lift of nozzle to avoid obstacles while moving |
| Purpose | Reduce stringing and blobs | Prevent nozzle collision with printed parts |
| Impact on Print Quality | Improves surface cleanliness and detail | Prevents layer scratches and defects |
| Movement Type | Filament extrusion control | Nozzle elevation adjustment |
| Settings Typically Adjusted | Retraction distance, speed | Z-hop height |
| Use Case | Important for stringy filaments like TPU or PETG | Useful when printing complex geometry or tall parts |
| Drawbacks | Can cause filament grinding or jams if misconfigured | May increase print time and cause minor artifacts |
Understanding Retraction and Z-Hop in 3D Printing
Retraction in 3D printing involves pulling the filament back slightly to prevent oozing and stringing during non-print moves, improving surface quality and detail accuracy. Z-hop lifts the nozzle vertically during travel moves to avoid collisions with printed parts, reducing layer defects and print failures caused by nozzle dragging. Understanding the balance between retraction settings and Z-hop height is crucial for optimizing print quality and minimizing print time.
Key Differences Between Retraction and Z-Hop
Retraction involves the backward pulling of filament to prevent oozing and stringing during non-print moves, minimizing excess material buildup on prints. Z-hop lifts the nozzle vertically between layers to avoid collisions with printed parts, reducing surface defects caused by dragging the nozzle across layers. While retraction controls filament flow to improve print cleanliness, Z-hop physically alters the nozzle path to enhance layer quality and prevent mechanical interference.
When to Use Retraction in 3D Printing
Retraction in 3D printing is essential for preventing stringing and oozing when the nozzle moves between different parts of a print without extruding filament. It works best during high-speed travel moves across open spaces where filament pressure can cause unwanted strands. Using retraction optimizes print quality by reducing blobs and ensures clean transitions between printed sections.
Advantages of Implementing Z-Hop
Z-hop reduces stringing and oozing by lifting the nozzle during travel moves, minimizing filament drag and surface defects. It effectively prevents scratches and damage on printed parts, especially when printing complex geometries or multiple objects. Implementing Z-hop enhances overall print quality by maintaining cleaner layer transitions and reducing post-processing time.
Common Issues with Retraction Settings
Common issues with retraction settings in 3D printing include stringing, blobs, and oozing caused by insufficient or excessive retraction distances. Incorrect retraction speed can lead to filament grinding or under-extrusion, while inappropriate retraction length fails to prevent filament leakage during travel moves. Fine-tuning retraction parameters and combining them with appropriate Z-hop can minimize these issues, improving print quality and reducing nozzle collisions.
Optimizing Z-Hop for High-Quality Prints
Optimizing Z-hop settings in 3D printing reduces stringing and prevents nozzle collisions by lifting the nozzle during travel moves without retracting filament. Adjusting Z-hop height to balance between sufficient clearance and minimal layer disruption enhances surface quality and ensures cleaner, more precise prints. Proper calibration of Z-hop combined with tailored retraction parameters leads to high-quality results while minimizing print defects such as blobs and layer shifts.
Retraction vs Z-Hop: Impact on Print Quality
Retraction minimizes stringing by pulling filament back during travel moves, reducing oozing and improving surface finish, while Z-hop lifts the nozzle slightly to avoid collisions and prevent layer defects. Excessive retraction can cause filament grinding or clogs, whereas improper Z-hop height may lead to layer misalignment or increased print time. Balancing retraction distance and Z-hop height is crucial for enhancing print quality, especially in complex geometries with multiple travel moves.
Troubleshooting Stringing with Retraction and Z-Hop
Stringing in 3D printing often results from inadequate retraction settings, causing filament to ooze during travel moves; optimizing retraction distance and speed reduces unwanted strands effectively. Z-hop lifts the nozzle during travel, preventing it from dragging filament across the print, which complements retraction by minimizing surface imperfections and stringing. Troubleshooting stringing involves fine-tuning both retraction parameters and enabling Z-hop to create cleaner prints with improved surface quality and dimensional accuracy.
Recommended Settings for Retraction and Z-Hop
Optimal retraction settings typically range from 1 to 6 mm for direct drive extruders and 4 to 7 mm for Bowden setups, with retraction speeds between 20 and 60 mm/s to prevent oozing and stringing. Z-hop is recommended to be enabled during retraction with a lift height of 0.2 to 0.5 mm to avoid nozzle collisions with printed parts while moving across the print bed. Fine-tuning retraction and Z-hop parameters based on filament type and printer model enhances print quality and reduces defects such as blobs and layer shifts.
Best Practices for Combining Retraction and Z-Hop
Combining retraction and Z-hop in 3D printing minimizes stringing and surface blemishes by retracting filament to reduce oozing while lifting the nozzle to avoid collisions with printed parts. Optimal settings include fine-tuning retraction distance and speed alongside a Z-hop height that prevents nozzle dragging without causing layer shifts. Balancing these parameters enhances print quality, especially for complex geometries with multiple retractions and travel moves.
Retraction vs Z-hop Infographic