In 3D printing pets, the top layer requires a smooth finish to accurately capture fine details and textures that define the pet's features. The bottom layer must ensure strong adhesion to the build plate to prevent warping or shifting during printing, providing a stable foundation. Optimizing both layers enhances the overall quality and durability of the final pet model.
Table of Comparison
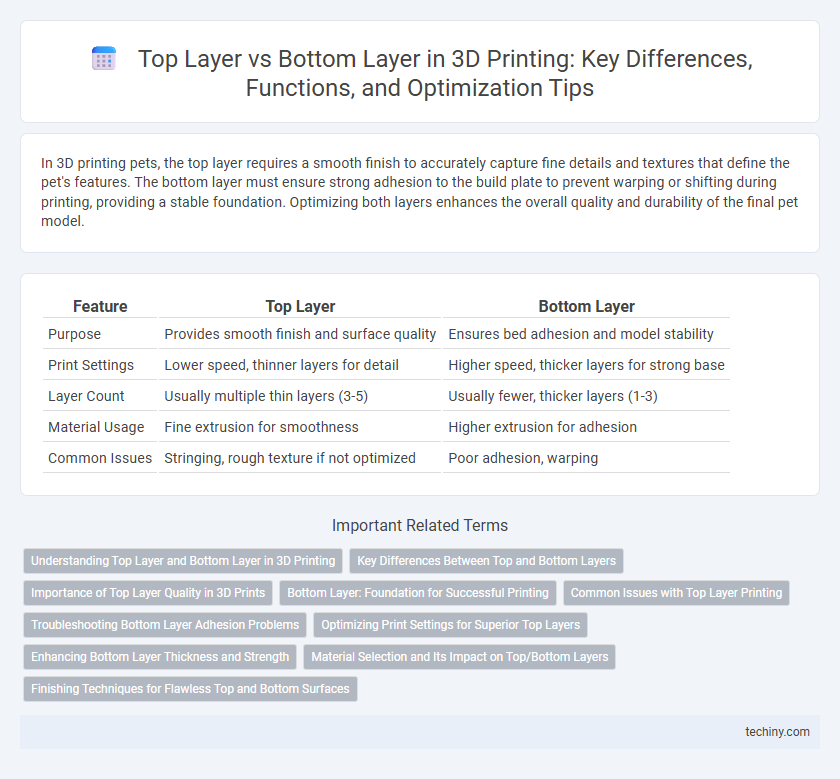
| Feature | Top Layer | Bottom Layer |
|---|---|---|
| Purpose | Provides smooth finish and surface quality | Ensures bed adhesion and model stability |
| Print Settings | Lower speed, thinner layers for detail | Higher speed, thicker layers for strong base |
| Layer Count | Usually multiple thin layers (3-5) | Usually fewer, thicker layers (1-3) |
| Material Usage | Fine extrusion for smoothness | Higher extrusion for adhesion |
| Common Issues | Stringing, rough texture if not optimized | Poor adhesion, warping |
Understanding Top Layer and Bottom Layer in 3D Printing
Understanding the top layer in 3D printing is crucial for achieving a smooth and precise finish, as it forms the visible surface of the printed object and requires optimal settings to prevent defects like gaps or uneven textures. The bottom layer serves as the foundation, impacting adhesion and stability, and is typically printed thicker and slower to ensure strong bonding with the print bed. Proper calibration of both layers, including temperature, speed, and extrusion settings, enhances overall print quality and durability.
Key Differences Between Top and Bottom Layers
The top layer in 3D printing is designed to provide a smooth, visually appealing finish and often requires higher print speed and cooling to avoid defects such as sagging or stringing. In contrast, the bottom layer focuses on adhesion, ensuring a strong bond with the print bed through optimized initial layer height, slower print speed, and higher extrusion temperature. Key differences include print settings, layer function, and surface quality, all crucial for overall print strength and aesthetics.
Importance of Top Layer Quality in 3D Prints
The quality of the top layer in 3D printing critically impacts the final appearance and functionality of the printed object, as it determines surface smoothness and detail resolution. Poor top layer quality can result in visible layer lines, uneven surfaces, and reduced strength, compromising both aesthetics and mechanical performance. Optimizing printing parameters such as layer height, extrusion temperature, and cooling ensures a high-quality top layer, enhancing the overall print integrity and visual appeal.
Bottom Layer: Foundation for Successful Printing
The bottom layer in 3D printing serves as the critical foundation for a successful print, directly impacting adhesion and stability throughout the process. Optimizing bed temperature, nozzle height, and layer speed ensures strong bonding to the build platform, preventing warping and print failures. A well-executed bottom layer sets the stage for precise layering above, enhancing overall print quality and durability.
Common Issues with Top Layer Printing
Common issues with top layer printing in 3D printing include insufficient layer adhesion, resulting in weak or incomplete surfaces, and poor extrusion control that causes gaps or uneven textures. Excessive cooling or improper temperature settings can lead to warping or surface roughness on the top layer. Optimizing print speed, nozzle temperature, and cooling fan settings significantly improves top layer quality and ensures smooth, solid finishes.
Troubleshooting Bottom Layer Adhesion Problems
Poor bottom layer adhesion in 3D printing often results from incorrect bed leveling, insufficient bed temperature, or improper use of adhesion aids like glue stick or painter's tape. Ensuring a clean, calibrated print surface and adjusting the nozzle height to the optimal distance from the bed can significantly improve first layer bonding. Using a heated bed set between 50-70degC for PLA or 90-110degC for ABS enhances material adhesion and prevents warping during initial layer deposition.
Optimizing Print Settings for Superior Top Layers
Optimizing print settings for superior top layers involves adjusting parameters such as layer height, print speed, and cooling to enhance surface quality and prevent defects like sagging or roughness. Increasing the top layer thickness by adding extra layers and reducing print speed allows better material deposition, resulting in a smoother finish and improved strength. Proper cooling ensures rapid solidification, minimizing warping and enhancing the aesthetic and structural integrity of the top surface in 3D prints.
Enhancing Bottom Layer Thickness and Strength
Enhancing the bottom layer thickness in 3D printing improves bed adhesion and reduces warping by creating a stronger foundation for subsequent layers. Increasing the number of bottom layers and adjusting extrusion width ensures optimal density and structural integrity. Proper calibration of temperature and print speed further strengthens the bottom layer, promoting overall print durability.
Material Selection and Its Impact on Top/Bottom Layers
Material selection critically influences the quality and durability of top and bottom layers in 3D printing, as different polymers exhibit varying adhesion, cooling rates, and surface finish characteristics. For instance, ABS offers strong bottom layers with excellent bed adhesion but can cause warping on the top layer without proper temperature control, while PLA provides a smoother top layer with less warping but may have weaker bottom layer bonding. Optimizing materials like PETG balances these traits, ensuring robust bottom layer adhesion and a glossy, defect-free top surface, enhancing overall print strength and aesthetics.
Finishing Techniques for Flawless Top and Bottom Surfaces
Achieving flawless top and bottom surfaces in 3D printing requires precise finishing techniques tailored to each layer's unique characteristics. The top layer benefits from fine-tuning print speed, nozzle temperature, and infill density to minimize imperfections and enhance surface smoothness. For the bottom layer, optimizing bed adhesion, leveling, and using a heated bed or adhesive aids ensures a clean finish and strong foundation for the entire print.
Top Layer vs Bottom Layer Infographic